Now that we’ve talked about images, it’s also important to discuss making movies.
Yep, you read that right–you can save your protein’s wiggles in a video!
To do this, follow
Extensions → Visualization → Movie Maker in the main
menu. This brings up the VMD Movie Generator menu (see the image below).
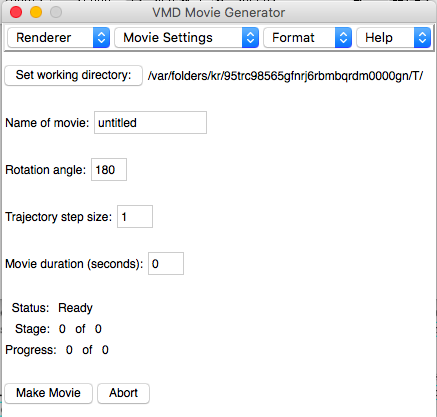
The first thing you should do is choose the working directory for making the movie. It’s set as a temp folder by default, which isn’t necessarily a bad thing, but it does mean that your movie will be saved in that temporary directory. So set it to a place you can find it, or just know how to get to that default temp directory. Next, title your film! Make it descriptive so future you knows what system it is and what you’re looking at.
Up in the dropdown menus, the first up is the Renderer.
Unlike images, using the Snapshot (screen capture) option is acceptable for
movies.
However, if you chose this option, it is critical that the VMD window isn’t
covered by other windows (or browsers or terminals, etc.) in the process,
because otherwise your video will have those landmarks in it.
Under Movie Settings, there are two that you’ll likely want to use for movies.
The first is Rotation about Y axis–this does exactly like it sounds.
The second is Trajectory.
This is what will actually save your wiggling protein as a movie.
As for format, the default MPEG-1 (ppmtompeg) should be fine, unless you have
a strong reason for needing a different format.
The other options, Rotation angle, Trajectory step size, and
Movie duration depend on what you’re doing and what you’re making the movie
for. The rotation angle specifies how far anything that rotates should.
If you’re using Rotation about Y axis to show off your protein, then you
probably want that to be 360; if you’re making a trajectory movie then you’ll
want it to be 0.
Trajectory step size specifies how many frames to skip when making your movie.
The larger the step size, the more choppy the video will look, but the shorter
it will be.
You only can choose to set a trajectory movie based on step size or
duration–not both.
Typically, people won’t want to watch anything more than a 25 second video
played on a loop.
Once you’ve decided all the settings, hit that Make Movie button, making sure
that nothing is in the way of the VMD OpenGL Display window (where you are
currently looking at the protein), and watch it go.
Success! A video has been made!